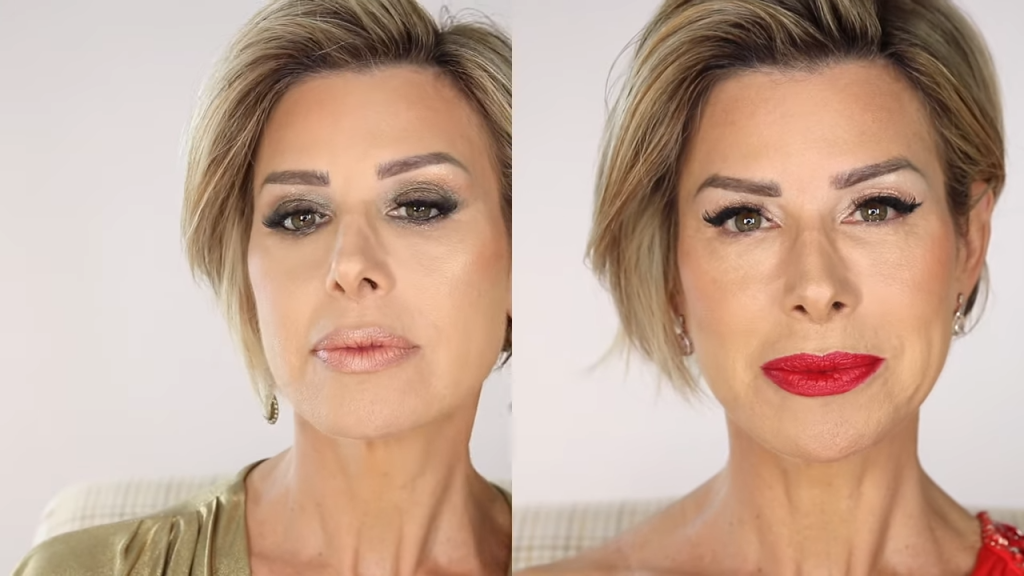


Hey there! Looking for some fabulous make up tips to enhance your natural beauty? We’ve got you covered, especially if you’re over 50. Let’s face it, as we age, our skin changes and so should our make up routine. In this article, we’ll share some tried and tested tips to help you embrace your age gracefully and feel your absolute best. So, get ready to revamp your make up game and discover the secrets to looking stunning at any age!

Skin Care
Moisturize regularly
Taking care of your skin is essential, especially as you age. One of the most important steps in your skincare routine is to moisturize regularly. As you get older, your skin tends to lose moisture, which can lead to dryness and fine lines. By using a moisturizer daily, you can keep your skin hydrated and supple. Look for a moisturizer that is formulated for your skin type and contains ingredients like hyaluronic acid or ceramides, which help retain moisture in the skin. Apply the moisturizer after cleansing your face and before applying any other skincare products or makeup.
Protect from the sun
Protecting your skin from the sun’s harmful rays is crucial at any age, but it becomes even more important as you get older. Sun exposure can accelerate the aging process and lead to the development of wrinkles, fine lines, and age spots. Make sure to wear sunscreen with at least SPF 30 every day, even if it’s cloudy outside. Additionally, seek shade during peak sun hours and wear protective clothing, such as hats and sunglasses, to further shield your skin from harmful UV rays.
Use gentle cleansers
When it comes to cleansing your skin, it’s important to choose gentle cleansers that won’t strip away its natural oils. As you age, your skin becomes more delicate, making it susceptible to dryness and irritation. Look for cleansers that are formulated for mature skin and contain hydrating ingredients like glycerin or aloe vera. Avoid using products with harsh chemicals or fragrances that can potentially cause irritation. Gently massage the cleanser onto your skin using circular motions, then rinse off with lukewarm water.
Exfoliate regularly
Exfoliating your skin regularly can help remove dead skin cells and reveal a brighter complexion. As you age, your skin’s natural exfoliation process slows down, making it even more important to incorporate exfoliation into your skincare routine. However, it’s crucial to choose gentle exfoliants that won’t be too harsh on your mature skin. Look for products with chemical exfoliants like AHAs or BHAs, which can effectively exfoliate without causing irritation. It’s recommended to exfoliate 1-2 times a week, but be mindful not to overdo it as excessive exfoliation can lead to dryness and sensitivity.
Apply anti-aging serums
Anti-aging serums can be a great addition to your skincare routine, especially if you’re looking to target specific concerns like wrinkles or uneven skin tone. These serums are typically lightweight and contain concentrated active ingredients that can help improve the appearance of aging skin. Look for serums that contain ingredients like retinol, vitamin C, or peptides, as they have been proven to have anti-aging benefits. Apply a few drops of the serum onto your cleansed face and gently massage it in until fully absorbed. Follow up with a moisturizer to lock in the benefits of the serum.
Foundation
Choose a lightweight formula
When choosing a foundation for mature skin, opt for a lightweight formula that won’t settle into fine lines and wrinkles. Heavy and thick foundations can make your skin look cakey and draw attention to the signs of aging. Look for foundations that provide buildable coverage and have a natural, satin finish. These formulas will give you a more youthful and glowing complexion without emphasizing any texture or lines on your skin.
Opt for a hydrating foundation
As we age, our skin tends to become drier, so it’s important to choose a foundation that provides hydration. Look for foundations that contain moisturizing ingredients like hyaluronic acid or glycerin. These ingredients will help keep your skin hydrated throughout the day and prevent your foundation from clinging to dry patches. Avoid matte or powder foundations, as they can accentuate dryness and make your skin appear dull.
Use a color-correcting primer
Color-correcting primers can work wonders in even out your skin tone and hiding any discolorations or redness. If you have age spots or dark circles, consider using a color-correcting primer before applying your foundation. Green primers can neutralize redness, while peach or orange primers can counteract dark spots or under-eye circles. Apply a small amount of the colored primer onto the targeted areas and gently blend it out using your fingers or a brush. Follow up with your regular foundation routine for a flawless finish.
Apply foundation with a damp sponge
To achieve a natural and seamless finish, try applying your foundation with a damp sponge or beauty blender. Dampening the sponge will help prevent the foundation from appearing heavy or cakey on your skin. Pour a small amount of foundation onto the back of your hand or directly onto the sponge, then gently dab and blend the product onto your skin using a bouncing motion. Start from the center of your face and work your way outwards for an even application.
Blend foundation well
To ensure a flawless finish, it’s crucial to blend your foundation well. Pay special attention to the jawline and hairline to avoid any harsh lines or visible demarcation between your foundation and natural skin. You can use a clean brush, a damp sponge, or even your fingers to blend the foundation seamlessly into your skin. Taking the extra time to blend will result in a more natural and smooth appearance.
Concealer
Select a creamy concealer
When it comes to concealing dark circles, blemishes, or any other imperfections, opt for a creamy concealer that won’t settle into fine lines. Creamy concealers have a smooth texture and provide good coverage without looking heavy or cakey. Choose a concealer that is one or two shades lighter than your natural skin tone to brighten the under-eye area effectively. This will help create a more youthful and awake appearance.
Use a shade slightly lighter than your skin tone
When selecting a concealer shade, it’s important to choose one that is slightly lighter than your skin tone. A slightly lighter shade can help counteract any darkness or discoloration, giving you a more radiant and youthful look. Avoid using a concealer that is too light, as it can create a stark contrast and draw attention to the areas you’re trying to conceal.
Apply concealer in a triangular shape
To effectively conceal dark circles, apply your concealer in a triangular shape under your eyes. This technique helps brighten the under-eye area and gives the illusion of lifted and more awake eyes. Start by drawing an inverted triangle with the base under your eye and the point extending towards your cheek. Use a small blending brush or your finger to gently blend the concealer into your skin, ensuring a seamless transition.
Blend concealer with a brush
To ensure a smooth and flawless application, use a brush to blend your concealer. Brushes allow for precise application and help distribute the product evenly onto your skin. Choose a small, synthetic concealer brush with dense bristles for the best results. Gently dab and blend the concealer using short strokes or a patting motion until it seamlessly merges with your foundation.
Set with a translucent powder
To lock in your concealer and prevent it from creasing or fading throughout the day, set it with a light dusting of translucent powder. Translucent powders are colorless and help absorb any excess oil or moisture on your skin, ensuring a long-lasting and matte finish. Use a fluffy brush or a powder puff to lightly press the powder onto the concealed areas. Be careful not to apply too much powder, as it can emphasize fine lines and make your under-eye area appear dry.
Eye Makeup
Use an eye primer
Using an eye primer before applying your eyeshadow can help prolong its wear and prevent it from creasing. Primers create a smooth canvas on your eyelids and help enhance the pigmentation and longevity of your eyeshadows. Apply a small amount of eye primer onto your eyelids and gently blend it out using your fingertip or a brush. This will ensure that your eyeshadow applies smoothly and stays vibrant throughout the day.
Opt for neutral eyeshadow shades
As we age, it’s generally best to opt for neutral eyeshadow shades that enhance your natural beauty. Neutral shades like taupe, beige, or warm browns can help define your eyes without drawing attention to any fine lines or crepiness on your eyelids. Avoid using overly vibrant or glittery eyeshadows, as they can accentuate any texture or lines on your eyelids.
Avoid shimmery or sparkly shadows
Shimmery or sparkly eyeshadows may be tempting, but they can actually highlight any crepiness or texture on your eyelids. To create a smoother and more youthful eye look, stick to matte or satin eyeshadows. These finishes are less likely to settle into any lines or wrinkles, giving you a more seamless and natural appearance.
Apply eyeliner close to the lash line
Eyeliner can help define your eyes and make them appear more youthful and awake. When applying eyeliner, aim to get it as close to your lash line as possible. This will create the illusion of thicker and fuller lashes, making your eyes appear more vibrant and open. Use a soft eyeliner pencil or a gel eyeliner for a precise application, and gently glide it along your lash line, starting from the inner corner towards the outer corner.
Curl your lashes and use mascara
Curling your lashes can instantly open up your eyes and make them appear more lifted. Use an eyelash curler to curl your lashes before applying mascara. Place the curler as close to the base of your lashes as possible and gently squeeze, holding for a few seconds. Repeat this process along the length of your lashes for a more pronounced curl. Finish off by applying a volumizing or lengthening mascara to add definition and drama to your lashes.

Eyebrows
Fill in sparse areas with eyebrow pencil or powder
As we age, our eyebrows may become sparser or lighter due to hormonal changes or the natural aging process. Filling in any sparse areas with an eyebrow pencil or powder can help define your brows and frame your face. Choose a shade that matches your hair color or is one shade lighter for a more natural look. Lightly fill in any gaps with short, feathery strokes, mimicking the appearance of hair.
Choose a shade that matches your hair color
When selecting an eyebrow product, it’s important to choose a shade that matches your hair color. This will help create a cohesive and natural look, without drawing attention to your brows. If you have lighter-colored hair, opt for a shade that is one or two shades darker than your natural hair color. For darker hair, choose a shade that matches your hair color or is one shade lighter for a softer effect.
Define the shape with short strokes
When defining your eyebrows, use short, feathery strokes to create natural-looking hair-like lines. Avoid using heavy or harsh strokes, as they can make your eyebrows appear unnatural and drawn-on. Start by defining the bottom edge of your eyebrows, then lightly fill in any sparse areas using short, upward strokes. Remember to blend the product well with a spoolie brush to soften any harsh lines.
Set with a clear brow gel
To keep your eyebrows in place throughout the day and add a subtle shine, set them with a clear brow gel. Clear brow gels help tame any unruly hairs and keep them in shape, giving you a polished and groomed appearance. Simply brush the clear gel through your eyebrows in an upward motion, following the natural arch of your brows. This will set the product and ensure it lasts all day.
Avoid overly harsh or dramatic brows
When it comes to eyebrows, it’s best to avoid overly harsh or dramatic shapes. As we age, softer and more natural-looking brows tend to be more flattering. Avoid creating sharp angles or very defined lines, as they can make your face appear older and less harmonious. Focus on enhancing your brows’ natural shape and filling in any sparse areas for a more subtle and youthful look.
Blush
Use a cream blush for a natural look
Cream blushes can be a great option for mature skin, as they provide a more natural and youthful finish. Cream formulas blend seamlessly into the skin and give a subtle and healthy-looking flush. Choose a cream blush in a shade that complements your skin tone, such as warm peachy or rosy tones. Using your fingertips or a stippling brush, apply the cream blush to the apples of your cheeks and blend it outwards for a natural-looking glow.
Apply blush to the apples of the cheeks
To achieve a youthful and radiant look, apply blush to the apples of your cheeks. Smile and identify the rounded areas of your cheeks when you smile – that’s where you want to focus the blush. Applying blush to the apples of your cheeks helps create a youthful flush and adds a healthy glow to your complexion. Use a brush or your fingertips to gently blend the blush upwards towards your temples, ensuring a seamless transition.
Blend well for a seamless finish
Blending is key when it comes to achieving a seamless and natural-looking blush. After applying the blush to the apples of your cheeks, use a clean brush or your fingertips to blend the product well into your skin. Aim for a soft, diffused look, ensuring there are no harsh lines or patches of color. Blending the blush will create a more polished and youthful appearance, giving you a healthy and radiant glow.
Avoid heavy or bright blushes
When choosing a blush shade, it’s best to avoid heavy or overly bright blush colors. These shades can appear harsh and unnatural, especially on mature skin. Opt for softer and more subtle blush tones that complement your skin tone. Warm peachy and rosy shades tend to be universally flattering and give a fresh and youthful appearance. Remember, less is more when it comes to blush, as it’s easier to build up the color than to remove excess.
Opt for warm, peachy tones
Warm, peachy tones can be incredibly flattering on mature skin and give a natural warmth to your complexion. These shades add a healthy glow and help brighten up dull or sallow skin. Look for blushes with undertones of peach, apricot, or coral, as they tend to suit a wide range of skin tones. Peachy blushes can create a youthful and fresh look, making you appear more vibrant and radiant.

Lips
Exfoliate the lips regularly
To ensure smooth and soft lips, it’s important to exfoliate them regularly. As we age, our lips can become dry and develop fine lines or flakiness. By gently exfoliating your lips, you can remove dead skin cells and create a smoother canvas for lipstick or lip gloss. Use a lip scrub or a soft toothbrush to gently massage your lips in circular motions. This will help improve blood circulation and leave your lips feeling soft and supple.
Use a lip primer to smooth the surface
Using a lip primer before applying any lip products can help smooth the surface of your lips and improve the longevity of your lipstick or lip gloss. Lip primers create a barrier between your lips and the product, preventing any feathering, bleeding, or settling into fine lines. Look for a lip primer with hydrating ingredients like shea butter or vitamin E, as this will also provide moisture to your lips.
Choose creamy or satin finish lipsticks
When it comes to choosing lipsticks for mature lips, opt for creamy or satin finish formulas. These textures provide hydration and glide smoothly on the lips, minimizing the appearance of fine lines or dryness. Matte lipsticks can be drying and can emphasize any texture on your lips, making them appear less plump and youthful. Creamy or satin finish lipsticks offer a more forgiving and comfortable wear, while still providing a lovely pop of color.
Opt for rosy or neutral shades
Rosy or neutral shade lipsticks can be very flattering on mature lips and give a fresh and youthful appearance. These shades tend to enhance your natural lip color and complement a wide range of skin tones. Look for lipsticks in shades of dusty rose, mauve, nude, or soft pinks. These colors can help brighten up your complexion and create a more balanced and harmonious look.
Define the lips with a lip liner
To achieve a more polished and defined lip look, consider using a lip liner. Lip liners help prevent any feathering or bleeding of your lipstick and create a crisp and precise lip line. Choose a lip liner that matches your natural lip color or the color of your lipstick. Use the lip liner to outline your lips, starting from the cupid’s bow and then working your way towards the corners of your mouth. Fill in your lips with the same lip liner for a longer-lasting and more defined lip color.
Highlighting and Contouring
Use a subtle highlighter
Highlighter can add a luminous glow to your complexion and create a more youthful and radiant look. Opt for a subtle highlighter that isn’t overly shimmery or glittery to achieve a more natural finish. Look for highlighters with a satin or pearl-like finish, as these tend to mimic a lit-from-within glow. Apply the highlighter to the high points of your face, such as the cheekbones, brow bone, bridge of the nose, and cupid’s bow, using a small brush or your fingertips.
Apply highlighter to the high points of the face
To accentuate your features and create a youthful glow, apply highlighter to the high points of your face. These areas naturally catch the light and will help enhance your bone structure. Focus on highlighting your cheekbones, the bridge of your nose, the cupid’s bow, and the inner corners of your eyes. Lightly sweep the highlighter onto these areas using a brush or your fingertips, ensuring a soft and diffused effect.
Choose a matte bronzer for contouring
Contouring can help add definition and shape to your face, giving you a more sculpted and youthful appearance. When it comes to choosing a bronzer for contouring, opt for a matte formula. Matte bronzers create a natural-looking shadow and are less likely to emphasize any texture or fine lines on your skin. Choose a shade that is one or two shades darker than your natural skin tone, and apply it to the hollows of your cheeks and along your jawline using a contour brush.
Contour the hollows of the cheeks and jawline
To contour your face, focus on the hollows of your cheeks and along your jawline. These areas tend to have natural shadows, and contouring them can add dimension and structure to your face. Use a contour brush or a small angled brush to apply the matte bronzer to the hollows of your cheeks. Start from the top of your ear and gently blend the product towards the center of your cheek, following the natural curve of your cheekbone. For the jawline, apply the contouring bronzer along the underside of your jaw, blending it downwards towards your neck for a more defined look.
Blend well for a natural look
To achieve a natural and seamless contour, it’s crucial to blend the bronzer well. Harsh lines or patches of color can make your contour appear more obvious and less natural. Use a clean brush or a blending sponge to gently blend the bronzer into your skin, focusing on softening any harsh lines or patches of color. Aim for a soft and diffused effect, ensuring that your contour seamlessly merges with your foundation and other makeup.

Setting the Makeup
Use a setting spray to make the makeup last longer
To ensure your makeup lasts throughout the day, consider using a setting spray. Setting sprays can help lock in your makeup and prevent it from smudging, creasing, or fading. Choose a setting spray that suits your skin type, whether it be for oily, dry, or combination skin. After you’ve completed your makeup routine, hold the setting spray a few inches away from your face and mist it evenly. Allow it to dry naturally before touching your face or applying any additional makeup.
Avoid heavy powders that can settle into fine lines
When setting your makeup, it’s important to avoid using heavy powders that can settle into fine lines and make your skin appear dry or aged. Opt for lightweight and finely milled powders that will help set your makeup without compromising its natural finish. Use a large fluffy brush to lightly dust the powder onto your T-zone and any areas prone to oiliness. Avoid over-powdering, as it can give your skin a flat and lifeless appearance.
Set only the areas prone to oiliness
If your skin tends to get oily throughout the day, focus on setting only the areas that are prone to oiliness. These areas are typically the T-zone, which includes your forehead, nose, and chin. Using a fluffy brush, lightly dust a small amount of setting powder onto these areas to help absorb excess oil and prevent shine. Leave the rest of your face free from powder to maintain a more natural and radiant finish.
Blot excess oil throughout the day
In addition to setting your makeup, it’s important to have oil-blotting sheets on hand to remove any excess oil throughout the day. Simply press the oil-blotting sheets onto your skin, focusing on areas that tend to get oily, such as the forehead, nose, and chin. This will absorb any excess oil without disturbing your makeup. Avoid rubbing or dragging the blotting sheets across your face, as this can disrupt your makeup and cause it to break apart.
Refresh makeup with a spritz of rosewater
If you find that your makeup starts to feel or look dull throughout the day, give it a quick pick-me-up with a spritz of rosewater. Rosewater is known for its hydrating and refreshing properties, and it can help revive your makeup without disturbing it. Simply mist a few sprays of rosewater onto your face, keeping your eyes closed. Allow it to air dry naturally, and your makeup will look refreshed and vibrant.
Makeup Removal
Remove makeup gently with a makeup remover
At the end of the day, it’s essential to remove your makeup gently and thoroughly. Leaving makeup on overnight can clog your pores and lead to breakouts or skin irritation. Use a gentle makeup remover that is suitable for your skin type, whether it be oil-based, micellar water, or cleansing balm. Apply the makeup remover to a cotton pad or cloth and gently wipe away your makeup, starting from your eyes and moving towards the rest of your face.
Use micellar water for a quick cleanse
Micellar water can be a quick and convenient option for removing makeup, especially on busy days. Micellar water contains tiny micelles that act like magnets, attracting and removing dirt, oil, and makeup from your skin. Soak a cotton pad with micellar water and gently swipe it over your face, focusing on areas with makeup. Micellar water is gentle and requires no rinsing, making it perfect for a quick cleanse before bed.
Cleanse the face with a gentle cleanser
After removing your makeup, it’s important to cleanse your face with a gentle cleanser to remove any remaining impurities. Choose a cleanser that is formulated for your skin type and doesn’t contain any harsh chemicals or fragrances. Gently massage the cleanser onto your damp face using circular motions, then rinse off with lukewarm water. Pat your face dry with a clean towel, being careful not to rub or tug at your skin.
Moisturize well after makeup removal
After thoroughly cleansing your face, it’s crucial to moisturize well to replenish any lost hydration. Choose a moisturizer that suits your skin type and contains nourishing ingredients like hyaluronic acid or ceramides. Apply the moisturizer onto your cleansed face and neck, gently massaging it into your skin using upward motions. This will help lock in moisture and keep your skin hydrated and plump.
Avoid harsh scrubbing
When removing makeup, it’s important to avoid harsh scrubbing or rubbing your skin. Scrubbing can cause irritation, redness, or even micro-tears in your skin’s delicate surface. Instead, opt for gentle and circular motions when removing makeup, and always choose soft cloths, cotton pads, or makeup remover wipes. Be patient and thorough with your makeup removal routine, allowing your skin to breathe and recover overnight.